Workflow Engine
The workflow engine admin panel is used to define the workflow and decide on how each business segment’s application should move. It is used for configuring deciding actions, approval matrix, and user profiles roles for each business segment. Through Workflow engine, We can configure following things,
View
After selecting the workflow engine template from the workflow module, the User lands on the screen where the user can view already added/existing workflow with the add workflow button.
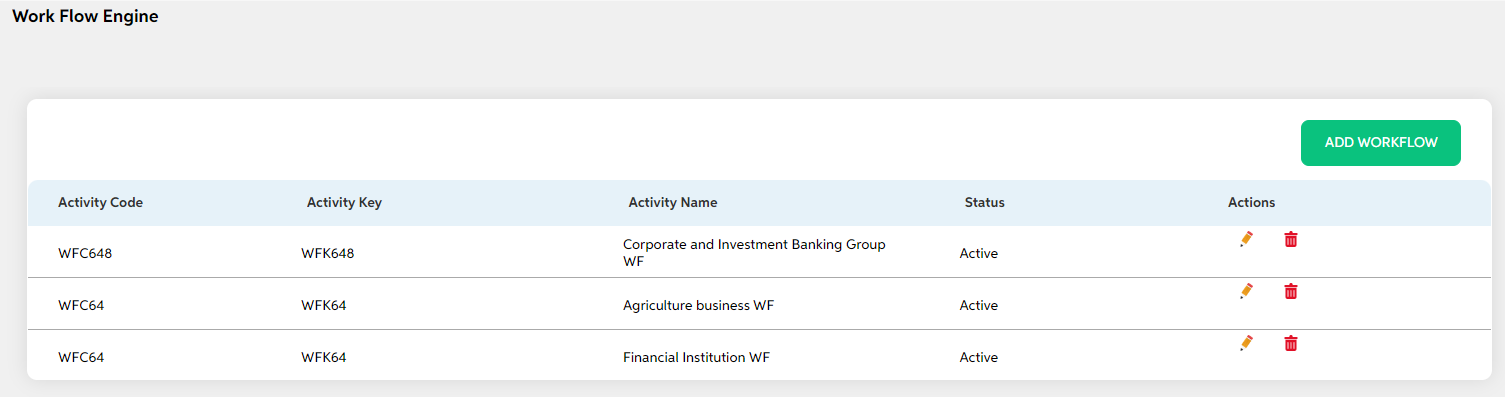
Users can view the below details of already added workflows:
- Activity code
- Activity key
- Activity Name
- Status
- Actions (Edit and Delete)
Add
The user can click on the add workflow button to add workflow. Users can enter details in the below fields and click on the save button. As the user saves, it is displayed on the view screen. If the user wants to cancel the adding workflow, the user can click on cancel. The user views a pop-up saying “Are you sure you want to cancel. All unsaved data gets discarded” with a yes/no option.
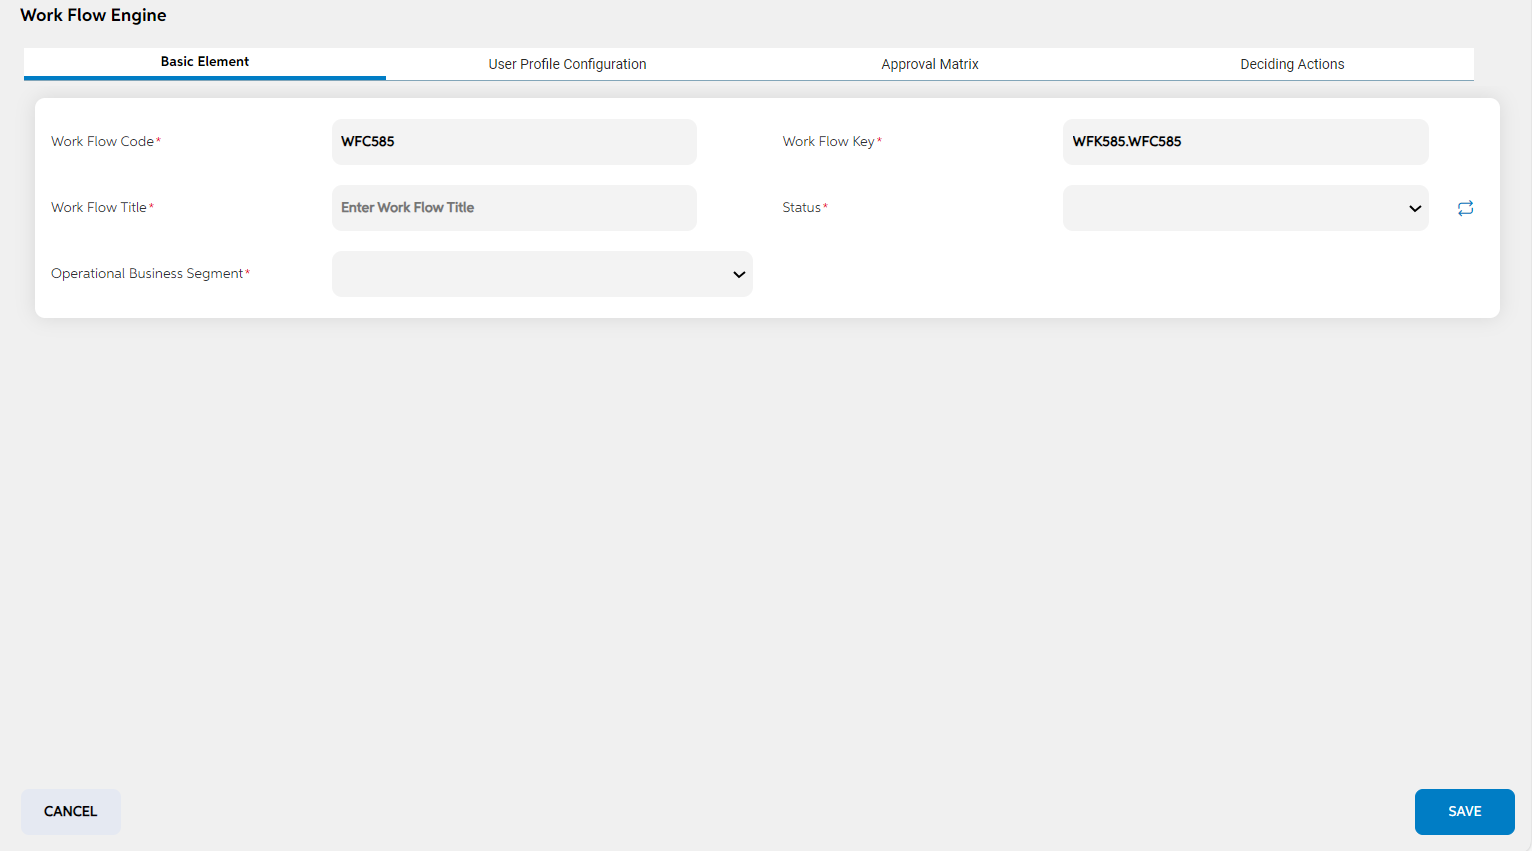
The Add workflow screen contains four sections:
- Basic Element
| Screen name | Field names | Description | Mandatory/non mandatory | Field type |
|---|---|---|---|---|
| Workflow engine (Basic Element) | Workflow Code | Code is auto generated by system. This code is currently a placeholder field, this can be used to link this record to matching record in any other third party or core system. | Mandatory | Auto populated |
| Workflow Key | key is auto generated by system. This key is used to link this record to another record in other admin screens. | Mandatory | Auto populated | |
| Workflow Title | Name of the workflow | Mandatory | Alpha Numeric | |
| Operational Business segment | To select which business segment this workflow is defined | Mandatory | Dropdown | |
| status | Status is to mention if this geographical location is active or inactive. If this is marked as inactive, then it will not appear on the respective screens. | Mandatory | Dropdown |
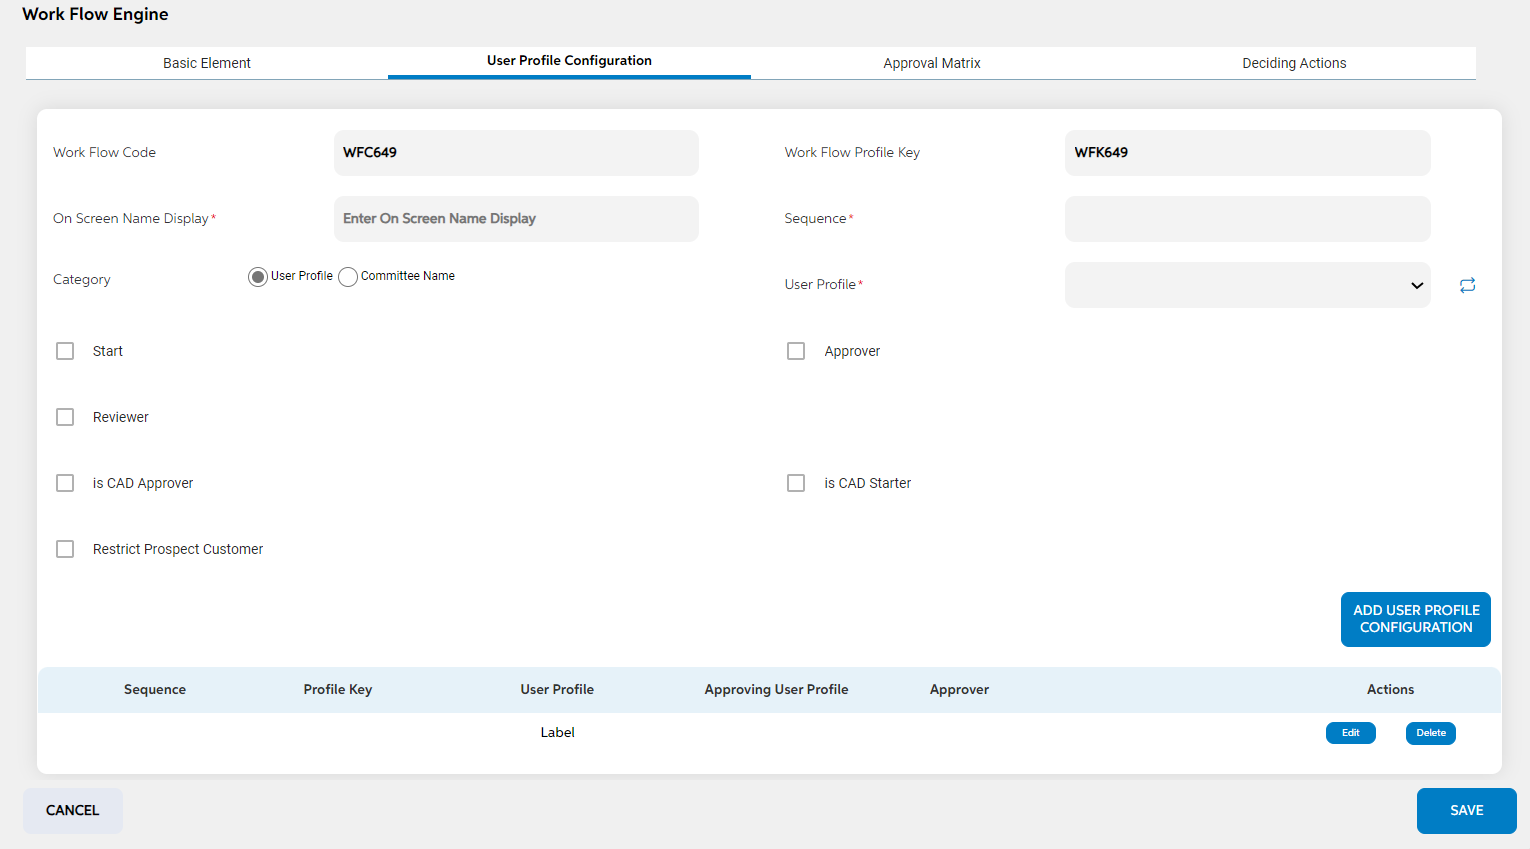
- User Profile Configuration
- The user profile configuration setup screen is used to configure the user profiles who are going to take part in that workflow.
- User needs to fill in below fields and add. The role of each user is also mentioned.
| Screen name | Field names | Description | Mandatory/non mandatory | Field type |
|---|---|---|---|---|
| Workflow engine (User Profile Configuration) | Workflow Code | Code is auto generated by system. This code is currently a placeholder field, this can be used to link this record to matching record in any other third party or core system. | Mandatory | Auto populated |
| Workflow Key | key is auto generated by system. This key is used to link this record to another record in other admin screens. | Mandatory | Auto populated | |
| On-Screen Name Display | This is to mention the display name in the user panel workflow diagram under the blue header | Mandatory | Alpha Numeric | |
| Sequence | This is to mention seniority /authority level of users. Higher the number, higher is the authority level | Mandatory | Numerical | |
| User Profile | Displays the list of user profiles who are going to be part of that workflow | Mandatory | Dropdown | |
| Start | It defines that the user profile that is selected is going to be the starter of the credit application for that business segment workflow | Optional | Check box | |
| Reviewer | It defines that the user profile that is selected is going to be the reviewer of the credit application for that business segment workflow | Optional | Check box | |
| Approver | It defines that the user profile that is selected is going to be the approver of the credit application for that business segment workflow | Optional | Check box | |
| Is CAD approver | It defines that the user profile that is selected is going to be the CAD approver of the credit application for that business segment workflow | Optional | Check box | |
| Is CAD Starter | It defines that the user profile that is selected is going to be the CAD starter of the credit application for that business segment workflow | Optional | Check box | |
| Restrict Prospect Customer | It defines for a particular user profile type when this checkbox is marked as Yes, Then the System will not allow the user to take any further action for that BCA wherein the customer is selected as Prospect | Optional | Check box |
- All the added user profile configurations will be listed below with the following details in a table,
- Sequence
- Profile Key
- User Profile
- Display Name
- Approver
- Action (edit and Delete)
- User can also edit and delete the added user profile configurations by clicking on the edit and delete icon.
- User can add multiple user profiles for the workflow by clicking on the Add user profile configuration button
- Approval Matrix:
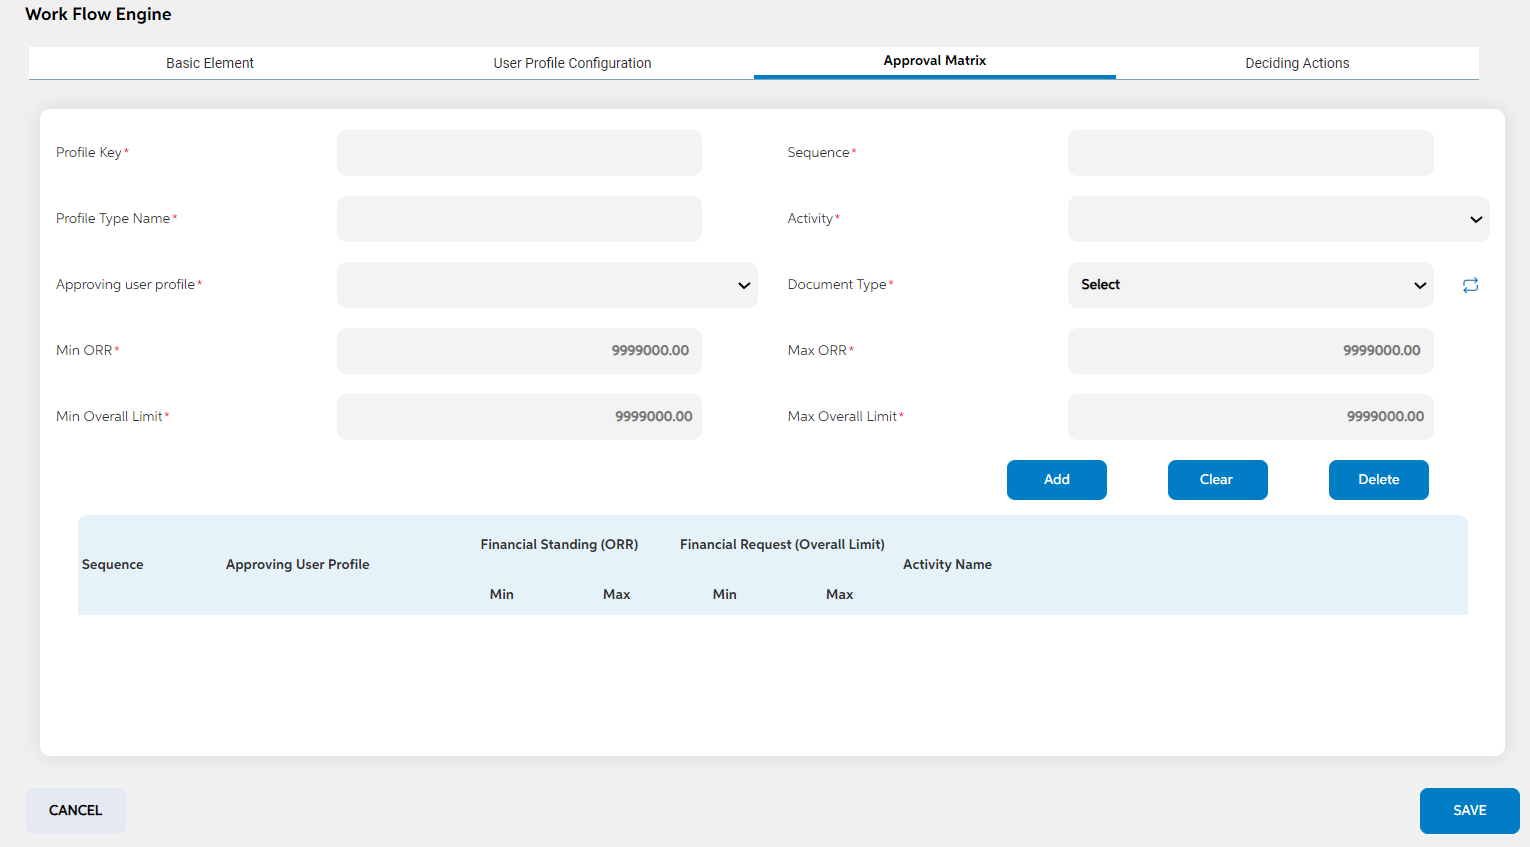
This tab is used to set the approvers based on few criteria,
- Facility amount
- ORR
- This screen displays only approver users as mentioned in the user profile configurations.
- The Approval Matrix section is used to configure the Max & Min ORR and Max & Min Limit of the credit application for the approving user profiles. These are the criteria on which approver can be configured.
- User will have the option to add multiple approval conditions for the credit application by clicking the add button for different activities.
- User can fill the below fields
| Screen name | Field names | Description | Mandatory/non mandatory | Field type |
|---|---|---|---|---|
| Workflow engine (Approval Matrix) | Profile Key | key is auto generated by system. This key is used to link this record to another record in other admin screens. | Mandatory | Alphanumeric |
| Sequence | This is mentioned to display order of the approvers in this screen | Mandatory | Numeric | |
| Approving User Profile | Displays the list of user profiles that are selected as approvers in the user profile configuration | Mandatory | Dropdown | |
| Activity | This field displays all the activities configured. Approver is applicable for the activity selected. | Mandatory | Dropdown | |
| Min ORR | It defines the Minimum obligor risk rating. If minimum | Mandatory | Numeric | |
| Max ORR | It defines the Maximum obligor risk rating Based on min and max ORR, Approvers are defined | Mandatory | Numeric | |
| Min Overall Limit | It defines the Minimum Overall limit of the credit application | Mandatory | Numeric | |
| Max Overall Limit | It defines the Maximum Overall limit of the credit application Based on min and max overall limit, Approvers are defined | Mandatory | Numeric | |
| Document Type | It lists the document type i.e. Crucial, Semi-Crucial, and Non Crucial. Based on the nature of document type, approver is configured | Mandatory for activity Document Deferral in progress and Document Waiver in Progress | Dropdown | |
| Min Days | It is used to define minimum days for document deferral | Mandatory for activity Document Deferral in progress | Numeric | |
| Max Days | It is used to define Maximum days for document deferral | Mandatory for activity Document Deferral in progress | Numeric |
- As the above details are filled and clicked on add button, User can view all the added approval configurations with the following details in a table
- Sequence
- Approving User Profile
- Financial Standing ORR (Min & Max ORR)
- Financial Request Overall Limit (Min & Max Limit)
- Activity Name
- User can edit the details by clicking on the already added approvers. Once it is clicked, details are prefilled. When the user clicks on the clear button all the values in the above-mentioned fields will be cleared.
- When the user clicks on the delete button the approval matrix will be deleted.
- Deciding Actions
- The deciding actions is used to define the actions that user profiles is going to perform for the particular credit application. It defines how an application should move from one user to another user.
- This is completely configurable by the bank. User can add multiple deciding actions for each user profile by clicking on the Add deciding action button.
| Screen name | Field names | Description | Mandatory/non mandatory | Field type |
|---|---|---|---|---|
| Workflow engine (Approval Matrix) | Deciding action title | Title of the Deciding Action | Mandatory | Alphanumeric |
| Deciding Action Text | Text that should be displayed | Optional | Alphanumeric | |
| From | It lists all the user profiles which are configured in the User profile configuration. It denotes from which user profile the system needs to forward or approve or revert the credit application | Mandatory | Dropdown | |
| To this | It lists all the user profiles which are configured in the User profile configuration. It denotes to which user profile the system needs to forward or approve and reverted the credit application | Mandatory | Dropdown | |
| Email Template | It lists all the email templates that are already configured in the email template admin panel screen. | Mandatory | Dropdown | |
| Deciding Action TAT | Turnaround time | Mandatory | Dropdown | |
| Notification Template | It mentions the notification type. It can either be forward, backward etc. | Mandatory | Dropdown | |
| Action Taken | It is to define what kind of action the user is going to take on the credit application | Mandatory | Dropdown | |
| Select Activities | It displays the list of workflow activities that are added in the workflow activities admin panel screen. It denotes that for which activity this deciding action is applicable. | Mandatory | List |
- Once the details are filled, user can click on add deciding action button. After which all the added deciding actions are clubbed under its respective user profiles and be listed with following details:
- Action Code
- From Profile
- Action Title
- To Profile
- Actions (Edit and Delete)
User can edit and delete deciding action by clicking edit and delete button each deciding action
Only one workflow can be configured per business segment
Edit
The user can edit the details of the already added workflow by clicking on the edit icon under the actions tab on the view page and saving the changes. Users can cancel the changes made by clicking on the cancel button. The user views a pop-up saying “Are you sure you want to cancel. All unsaved data gets discarded” with a yes/no option.
Delete
If the user wants to delete any Workflow, then the user can click on the delete icon under the actions tab. The user views a pop-up for confirmation “Are you sure you want to delete it?” with a yes/no option/ User can choose to clock on yes and delete it.
Prerequisites Configuration
| Screens to Configure (as Pre-requisite) | Screen name | Reflection in the user panel | Reflection in the admin panel |
|---|---|---|---|
The above screens are prerequisite for workflow engine screen |
Workflow Engine | It is reflected in the user panel Workflow and application is moved based on the configurations done here | NA |
In this topic